Tuesday, 22 February 2011


Later, I have clicked on the camera and going to modify panel where is the multi pass effect I have selected enable button. then clicking on preview and going to render I made sure that viewport is camera. there it is easy to see how the changes were made. I have changed the position of the camera putting it on the teapot and then the depth of field changed as well, so now it is easy to see that the teapot looks clear as a main figure, and others are more as a back view.


on week 5 we had to create a camera and try it with some figures.

First of all, three figures were created on the plane. Then, the camera was put with pressing CTR+ C and tryed in different positions.

Monday, 21 February 2011

I have made one of my models which is pistol from the last episode where James Bond as a shadow will shoot from his pistol and the bullet will fly through all the scene symbolising his revenge!

This model was created following some youtube tutorials what was quite useful.


First of all, the box was created on the viewport and the parametres of it were changed. Then I right clicked in the corner of the 3d viewport and selected Edged Faces. Converting the box to editable poly (right click-convert-editable poly) I used vertex mode while working on top, left and write views and changing the shape of the box. I selected all the boxes faces and scrolled down, then clicked clear all. (I deleted the lowest raw as I did not need it and made a bridge ). Choosing editable poly's edge I have rightclicked and selected CUT to create a rectungle on the top of the pistol (it was extruded later) to make a sight.
I made another box and also changed its parametres. It was almost the same process which I did with the first box. With polygon mode I have selected 1 peace on box 2 to extrude from it a leg of the pistol. Then holding shift and choosing the line I extruded again so my pistol leg consists from 2 parts. I matched some points and changed their direction so the leg looks realistic.


Wednesday, 16 February 2011


We had to create some models and make experimentation with shadows and lights.
The omni light was used to make a shadow of the objects, later following online tutorial we learnt how to make objects look glassy and to change the environment as it will look like day light around.


Putting the light over the objects I have changed the colour of it and it made pink effect shining on the objects.

Tuesday, 15 February 2011


On week 4 the task was to put patterns and lights to the pumpkin given to us.
So, I added pattern to the pumpking through bitmap as it was done before with the leaf. (I found a pattern of pumpkin in google).

The omni light was used to make the pumpkin shiny inside.

the shadows on also were used to make an object look realistic owning its shadow.

The spot light was used and the green colour was selected that it shines with smoky green light to the pumpkin.

Tuesday, 8 February 2011


Following some other tutorials had more practice on adding patterns and shadows to the objects.


I found that going to program files there are many patterns which can be added as a background and colour to the objects.


Week 3 Introduction to materials.


To make a shadow the light was selected and omni was clicked. Then going directly to the surface (plane) and using move tool it was moved away from the leaf. Going to the modify panel the shadows on was selected. At the end, the ray traced shadows was clicked. Pressing F9 it was easy to see that the leaf started to own its own shadow.
First of all, the plane was created and later was used as a background. Then, the shape of a leaf was made and the pattern which is on the left was added to it.

Later the same picture of the leaf was opened in photoshop and changed to black and white. After that was done, it was imported to 3ds max as bitmap to the same 1st default and applied to created shape. Pressing F9 it is easy to see how it looks.


These are some patterns imported to the program which I was trying as a background.


On week 3 we had to make a leaf and add it a colour (pattern).


This picture was found on internet and saved because later it was imported to 3ds max as bitmap.

Sunday, 6 February 2011

Mood Board


I want to make a scene with flying bullet. James Bond will appear as a shadow. These scene will symbolise his revenge.
Mood Board


Second scene will be about episode where James Bond's plane get crashed in the aircraft fight.

Friday, 4 February 2011

Mood Board


I will show the scene where Bond is followed by his enemies on cars.


Another task was to create a tank. Before making a 3d model I created 1 plane and making a copy of it made them perpendicular. Later clicking write click of the mouse I made two planes freezed that they don't move. Then I imported the 2d drawings of the tank into the program to apply them to the planes. It was made with pressing M on the keyboard and using bitmap. Every part of the tank was made by shapes and corrected by choosing editable poly where it is easy to change the edges of every detail. Before giving a colour in properties was clicked (see-through) it is easier while building. Later different colours can be given.

This task was not the easiest one, it took time to create 3D model of the tank. I think doing more practise will help me to get better and faster with modelling.
Tank was made from both sides.
Now it is green and looks more realistic.


From the beginning another colour was tried which does not really fit to this machine and looks funny.

Thursday, 3 February 2011

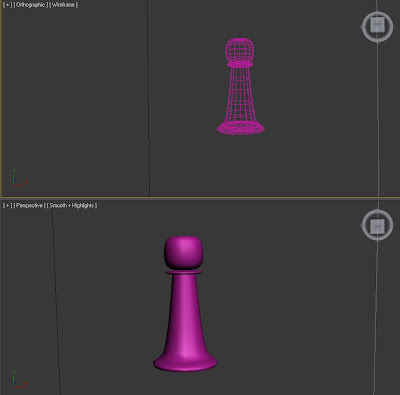
The task for week 2 was to create a chess using an Adobe Illustrator to make a drawing with pen tool (a half of the chess) and then to import it to 3Ds max. Later to convert 2d figure to 3d the hierarchy tab was clicked and pivot was selected (affecting pivot only). Then move tool and 'lathe' were chosen to make the figure being 3d. Choosing 'weld core' the chess became solid and looks like the real one.